Programming the Version 2 TK-481
The TK-481 Version 2 radios are programmed for the amateur band by using KPG-49D which is Kenwood programming software (i.e. copyrighted software, not freeware). The Version 1 TK-481 handheld is programmed using KPG-35D, you cannot use KPG-49D to program them. If you don't know what version TK-481 you have then please see the "TK-481 General Info" section of this website.
Programming the TK-481 Version 2 radio is performed by using KPG-49D to program in your desired frequencies and then saving the file and running KW900EZP.exe, which is a freeware program developed by Pete, N2MCI. There are 5 versions of KPG-49D software, however for this how-to section we are going to use KPG-49D Version 4.xx, which are Windows based software and will work on ANY Windows computer running 95 thru Windows 10 once again, CPU speed does not matter!
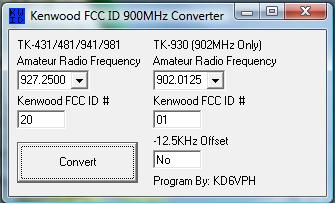
The radio is programmed using FCC ID numbers. Since this is a commercial radio these numbers range from 1 which represents 935.0125MHz all the way up to 399 which represents a frequency of 939.9875MHz. For use in the amateur band the only FCC ID’s we are interested in is 1 through 79; FCC ID 1 being 935.0125MHz and FCC ID 79 being 935.9875MHz. At this point you may be thinking what good does 935.0125 do us if that amateur band is down at 927MHz? Using Pete’s program KW900EZP.exe we can change the 935.0125MHz into 927.0125MHz very easily! This is because KW900EZP.exe takes any 935.xxxxMHz frequency and converts it to 927.xxxxMHz, and unless the conventional channel is set to “Talk Around” (simplex) will automatically apply a 25MHz offset.
Using KwID.exe or the KW900EZP frequency to FCC ID chart we see that FCC ID 1 corresponds to 927.0125MHz and that FCC ID 79 corresponds to 927.9875MHz, i.e. the frequencies are modified in the saved .DAT file by the program KW900EZP.
You may be wondering how to program the radio for a repeater that has an odd split. For example a repeater that has an output frequency of 927.6500MHz but an input frequency of 902.0125MHz. Well, this is done using the EZ-Edit function of KW900EZP, which will allow you to enter in separate transmit and receive frequencies. If this all sounds like a lot of work; it’s not, as it takes under 30 seconds to save the programmed KPG-49D file and run KW900EZP - pretty painless and quick.
Programming Cable
To program up any Version 2 TK-481 to the 33cm band will require the KPG-36 programming cable- see the "Program Cables" section of this website for more information. The KPG-36 programming cable are available in either USB or serial port DB-9 connectors and either will work fine with KPG-49D Version 4.xx. If you are using KPG-49D Version 2 or 3.01 then you must use a Serial port Cable or use the program DOSBox if you have a USB programming cable as USB ports are not supported in DOS. These programming cables are available via eBay for $10-$15.
Step by Step Programming
In the interest of being thorough I am going to go through the ENTIRE KPG-49D program so that you have an idea of what most features are and should be set to. For the people that have dealt with commercial radios before this is going to be painful, but this procedure was written to be as easy as possible and appeal to a wide audience.
One thing before we begin is this: you CANNOT hurt the radio with bad programming or loose any features in the radio by writing some corrupted file to the radio- this just doesn't happen with Kenwood!
On to the Programming!
- Install the program KPG-49D version 4.xx (Windows based versions) on your computer
- Install the program KW900EZP.exe AND the program KWx81ETA.exe in the “DATA” folder of KPG-49D, the default “DATA” file location is usually: C:\Program Files\Kenwood Fpu\KPG49D
- Save KwID.exe to the Windows Desktop (or where ever you want) and have KwID.exe running or the KW900EZP FCC ID to frequency chart handy
- Run KPG-49D

- Under the “Model” tab at the top left of the screen, select “Model Information”
- From the “Model Information” tab select “TK-481 [Portable]” or if you have a Version 2 TK-481 DTMF Keypad model then select "TK-481 [Portable](Key Pad Model)" under the “Model Type”
- Under the “Option Board” heading make sure you have “None” selected and then uncheck the box where it says “Fleetsync Enhanced Function”.

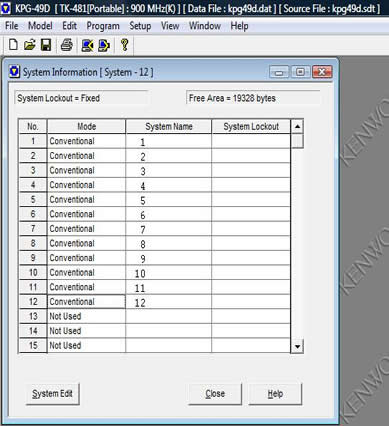
- You will need to add Conventional Channel Systems (memories) so under the “Mode” column click on the Number 1 Mode Box and select “Conventional”. Add as many Conventional Systems as you are going to program- you can always add more at a later date- pictured below I have added 12 Conventional Systems- you can add up to 32 and then from there add to each System Group- you can have up to 600 Conventional memories!
- At this point you can start to program repeaters/simplex frequencies. This can be done by selecting the Mode 1 Conventional System and clicking “System Edit” at the bottom of the box.
- We are going to add our first repeater of 927.2500MHz with a 25MHz offset- you can add whatever repeater you want, I chose this frequency as an example. Run the program KwID.exe or reference the KW900EZP frequency to FCC ID chart and we see that a frequency of 927.2500MHz would be FCC ID 20, so type “20” in row 1 under “FCC Channel”. You will see that the frequency at the top of the screen will read 935.2500MHz. This number will change to 927.2500MHz once KW900EZP is run in a later step. Enter in the Encode/Decode QT/DQT (Encode/Decode PL/DPL) in this example I have added a tone of 114.8Hz for the Encode and Decode Tone and Group Name (name of repeater or frequency etc.) of "SouthMt WA" (a local repeater in Washington).

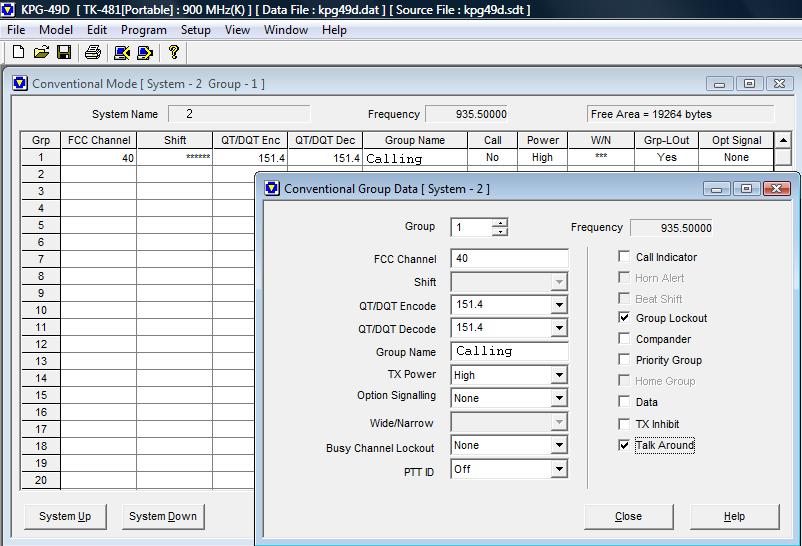
- Click on the “System Up” tab at the bottom of the window and the page will change to SYSTEM 2, add the next frequency you want in GROUP 1. As an example we are going to add our first Talkaround (Simplex) frequency of 927.5000MHz with an Encode and Decode tone of 151.4Hz. In looking at what 927.5000MHz would be in KwID we see that the ID # is "40" so in the "FCC Channel" column we enter "40" as well as the Encode/Decode Tone of 151.4Hz and give it a name of "Calling" when finished click on the box that reads “Group Data” at the bottom, then select the box that reads “Talk Around”- this will make this channel a talkaround channel, i.e. simplex channel.
- To program the next repeater or simplex channel go to “System Up” and enter the next FCC ID in SYSTEM 3 GROUP 1. The reason we enter the next Repeater or Talkaround frequency in SYSTEM 3 GROUP 1 is due to how the radio Scan function works. You can scan 32 different frequencies at once; the radio will scan each SYSTEM and the SELECTED GROUP in each SYSTEM. Scanning 32 Systems should be more than enough frequencies for even the folks that live in Los Angeles, the SF Bay Area, New England or other 900MHz dense areas of the country.
- After you have programmed all the repeaters and Talkaround frequencies you desire its time to set up the options in the radio's "Optional Features" Menu. Click on the "Edit" menu then go to "Optional Features". From the "Optional Features 1" menu we can configure settings such as the Time Out Timer, Power on Text (you can add your callsign) and front panel LED settings. See the image below to get an idea of the recommended settings.

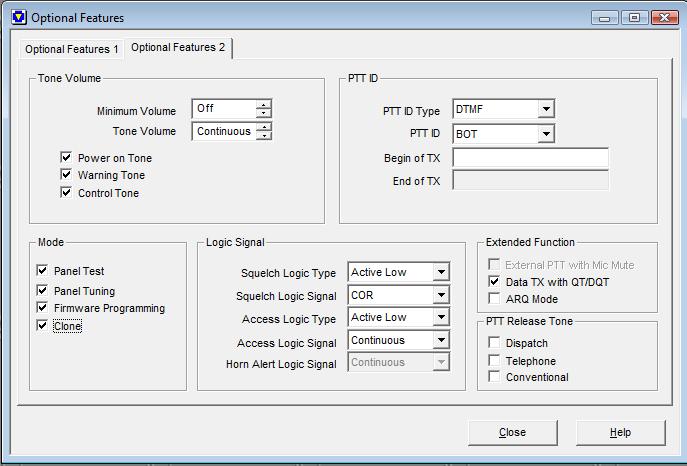
- From the "Optional Features 2" menu (located in the backround of "Optional Features 1" tab) we can configure settings such as Minimum Volume, and most importantly Panel Tuning. Panel tuning is where such things as maximum deviation, maximum tone deviation, power out, etc...can be adjusted, do not change these unless you understand what you are doing. See the image below to get an idea of the recommended settings.
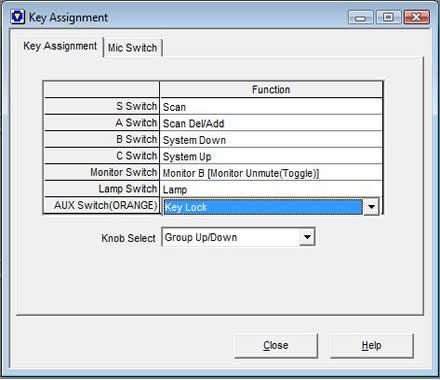
- We can now assign the front panel key buttons a function. The front panel keys can be assigned several functions including Scan, Scan Add/Delete, and other features including the Talkaround feature. This feature is not available in KPG-49D but is a feature that can be added by using N2MCI's program KWx81ETA.exe. I would recommend that this feature be assigned to the "A", "Monitor" or "Aux" (Orange) button so decide at this point which button you would like to assign the feature to and leave it as whatever you want, in this example I have assigned it the "Key Lock" function- we will add this Talkaround feature in a later step. See the screenshot pictured below.
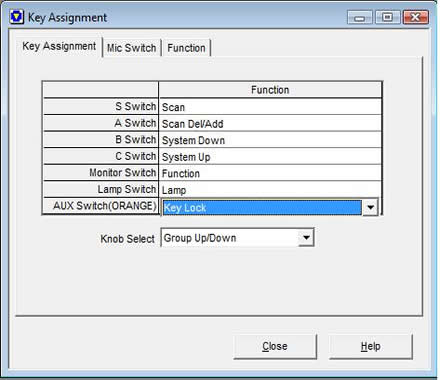
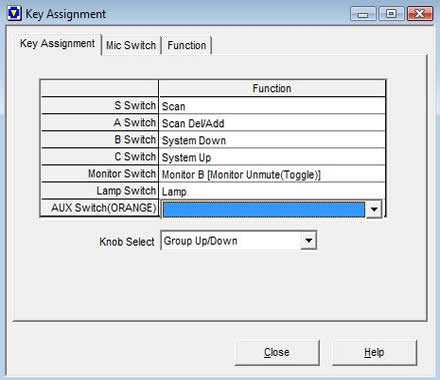
- If you have a Version 2 DTMF TK-481 the screen pictured above will be a little different and look as pictured below. This difference is because of the added "Function" tab which adds more programmable buttons to the front panel.
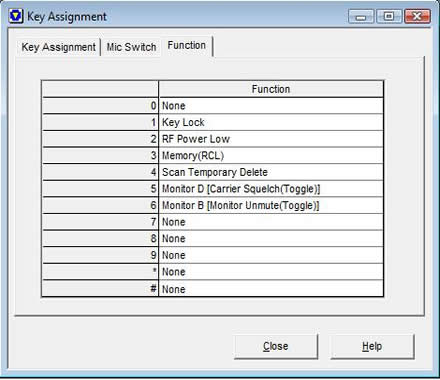
- If you have a DTMF Version 2 TK-481 radio and choose to assign one of the front panel buttons pictured above the "Function" key assignment then you can assign the front panel keys 0-9, *, and # other programmable functions such as that pictured below. For example, if you programmed the "Monitor Switch" to be the "Function" button and also programmed the "2" button to be the "RF Power Low" button then to toggle the radios RF power output to low power press the "Monitor Switch" button (the display will read "Function") and then press the "2" button, the radio will now be in low power mode.
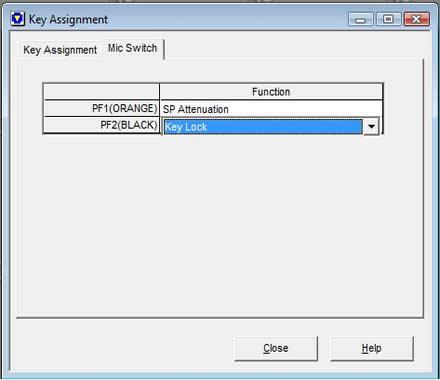
- If you are going to be using a KMC-25 or KMC-41 Speaker Microphone on your non-DTMF Version 2 TK-481 then you can program the 2 buttons that are on those microphones to perform different functions. Pictured below I have assigned the microphones the "SP Attenuation" and "Key Lock" functions.
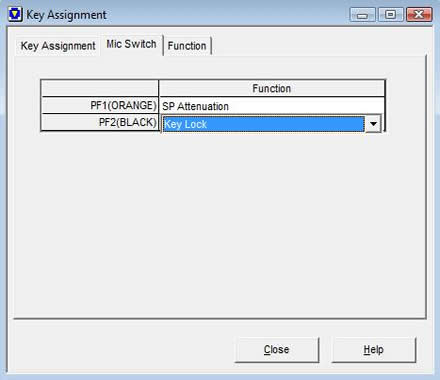
- If you are using a DTMF Version 2 TK-481 and planning on using the KMC-25 or KMC-41 Speaker Microphone then the screen pictured above will look a little different. Pictured below I have assigned the the 2 buttons on those microphones the "SP Attenuation" and "Key Lock" functions.
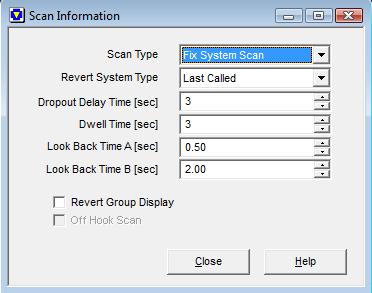
- One of the most important settings in KPG-49D is the scan settings under the "Scan Information" tab. Make sure you leave the "Scan Type" as "Fix System Scan". DO NOT, under any circumstances, use "List Type System Scan". The recommended setting shown below for "Revert System Type" is set to "Last Call". If you still do not understand how scan works on a Kenwood see the TK-481 "Troubleshooting" section.
- We are now ready to move on to the DTMF settings, you can edit these settings if you are using a Version 2 TK-481 with DTMF, if not then skip this step and move on to step 22. Pictured below are the recommended settings for a Version 2 TK-481 with DTMF.

- So at this point we are ready to save the program file and convert all our 935.xxxxMHz frequencies to 927.xxxxMHz frequencies. Go to the "File" menu and then select "Save As..." and then select "Data File" then give the saved file a name, such as "481.dat" OR whatever you want. Save the file in the "Data" folder of KPG-49D, this is where you already have KW900EZP.exe saved in Step 2. Exit out of KPG-49D or you can leave KPG-49D running just ensure that your current file (the one we have been working on, in this example "481.DAT") is not open.
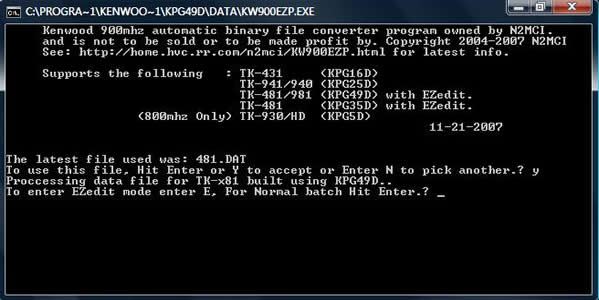
- Go to "My Computer" on your Windows Desktop, and then go to your hardrive where you installed KPG-49D- this can be found by opening the folder "Program Files" then "Kenwood Fpu", then open the folder "KPG49D", then finally open the folder "Data" where KW900EZP.exe is and run KW900EZP.exe. KW900EZP will automatically select the last saved DAT file that KPG-49D used, select "Y" if the program found your last saved file, in this example is should be "481.DAT". See the screenshot pictured below.

- You Pressed "Y" in the above pictured step, now its time to run the program so it converts all those saved 935.xxxxMHz frequencies to 927.xxxxMHz ones! Press the "Enter" button and the program will run and automatically close. See the screenshot pictured below.
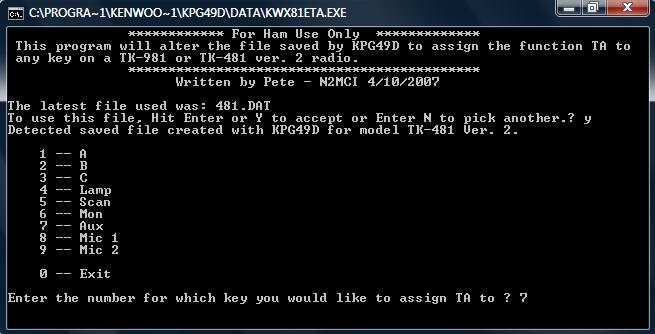
- At this point you can now, if you want to, assign one of the front panel buttons on the radio the feature of Talkaround. So in the "Data" folder (where you are now) run the program KWx81ETA.exe, and select which front panel button you want to assign Talkaround to- I would recommend that you choose either the "A", "Mon", or "Aux" (Orange button) button for this feature. In the screenshot below I choose to use the "Aux" button.
- We can now check our work and run KPG-49D, open your saved DAT file, in this example "481.DAT". You will now see that all of the 935.xxxxMHz frequencies have disappeared and become 927.xxxxMHz frequencies, and that the FCC ID numbers have changed and become really long numbers- do NOT try to edit these numbers, you can change what ever settings you want to in the program, but if you want to edit the frequencies, i.e. edit the FCC ID numbers then you will have to re-run KW900EZP again, which is no big deal, its just something to keep in mind.
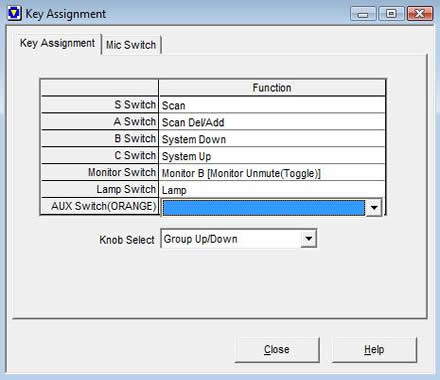
- If you want to check to see if the Talkaround feature was added to the front panel of your non-DTMF Version 2 TK-481 then go to "Edit", then "Key Assignment" and your screen should look like this, a blank box in the "Aux Switch(ORANGE)" function button, if you assigned the talk around feature to the "Aux Switch(ORANGE)" button.
- If you have a Version 2 DTMF TK-481 model then your "Key Assignment" page is going to look as pictured below if you assigned the talk around feature to the "Aux Switch(ORANGE)" button after running KWx81ETA.exe.
- Final step, program the radio! Ensure that KPG-49D is not running (close the program if it is). Connect your program cable to the USB or Serial DB-9 port on your computer, connect the KPG-36 program cable to the microphone connector port on the radio, then power on the radio. Start KPG-49D, open your saved DAT file by going to the "File" menu then select "Open", open your saved DAT file, which in our example above, would be "481.DAT" and go to "Setup" and select the communications port that the radio program cable is plugged into, then go to "Program" and then "Write Data to Radio", the front of the radio will say "Program". There are no buttons to press and hold to put the radio in program mode- it will go into program mode automatically. Thats it, your finished!!! While this whole process seemed to be rather time consuming once you have done it a couple times you can program a radio rather quickly.
- As an added note, if you have two TK-481's and one is a DTMF version and the other is not, its easy to program both using the same .DAT file even though one unit has a DTMF panel and the other does not, meaning you do not need two seperate .DAT files for each radio. This is accomplished by opening the saved .DAT file for either the DTMF or non-DTMF radio (which ever radio you created the .DAT file for), going to the "Model" tab, selecting "Model Information" and then selecting the type of radio you wish to copy the programming to such as “TK-481 [Portable]” or "TK-481 [Portable](Key Pad Model)" and then writing to the radio, its that easy!
KW900EZP EzEdit Function
In the introduction section of this page I mentioned a feature in KW900EZP.exe that is called EzEdit. What EzEdit does is allow you to change the transmit and receive frequency independently- meaning that if you have a repeater that uses an odd split you can program the repeater input frequency separately from the repeater output frequency or vice-versa. Below is the step by step how-to on entering odd split (non-25MHz) repeater frequencies or even talkaround frequencies. Please note that just because you can program it, does not mean that the radio will receive it- for 2 main reasons: the VCO will unlock and the receiver bandpass filters.
- In out first example of programming above; Step 10, we added our first repeater, which was the "SouthMt WA" repeater which had a transmit (output) frequency of 927.2500MHz and an receiver (input) frequency of 902.2500MHz. Lets suppose that in our example above that the repeater has an output frequency of 927.2500MHz (the same as before) BUT has an input frequency of 902.0125MHz- this would be an odd split repeater, not 25MHz. We programmed that repeater in SYSTEM 1 GROUP 1, take note of what System and Group the repeater you want to edit is programmed in.
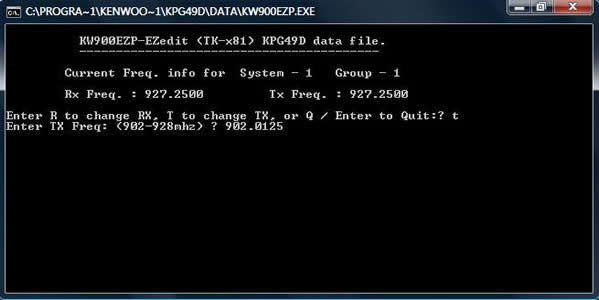
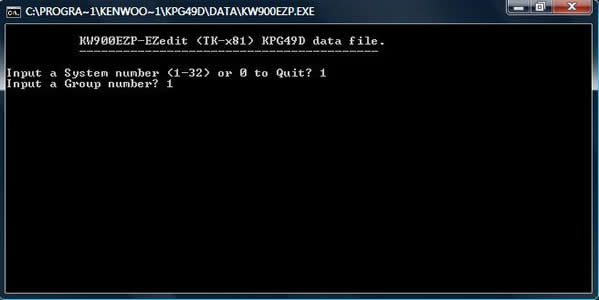
- If you have programmed up and saved your DAT file in KPG-49D and already run KW900EZP.exe to convert the 935MHz frequencies to 927MHz frequencies then close the program and go to the "Data" folder where it is saved- this would be the directory where KW900EZP is saved as well. Run the program KW900EZP. By default the program will select the last used DAT file, if it selected the correct one then press "Y" and the program will go to the next step. The Next step in this example will be to select EzEdit mode, Press "E" for EzEdit mode. Now enter in the System and Group numbers that you want to edit, in this example it is System 1, Group 1. See the screenshot pictured below.
- The screen will now change to show you what the current transmit and receive frequencies are, you can now elect to change the TK-981's transmit frequency to our above mentioned value of 902.0125MHz- which is the repeaters input frequency. Press "T" to edit the transmit frequency. See the screenshot pictured below.
- You are now set to actually enter the transmit frequency of 902.0125. Enter the frequency in and press "Enter". If this is the only System and Group you want to edit then you are finished, if there are more then follow the program steps. It is important to mention that prior to running the EzEdit mode of KW900EZP you must run KW900EZP to convert all the 935.xxxxMHz frequencies to 927.xxxxMHz frequencies and from there you can EzEdit to your hearts delight! See the screenshot pictured below.