TK-481 Tips and Modification
TK-481 KPG-49D Password Protected Radio Overwrite Bypass
The Kenwood TK-481 has a feature in the programming software, KPG-49D, that allows the .DAT file programmed in the radio to have a read protection password. This password protection only protects the file from being read from the radio, you can simply overwrite the file in the radio without issue (there is no write password). To read a password protected TK-481 perform the following steps:
- Start KPG-49D (Version 4.xx) and read from the password protected radio
- Go to "PROGRAM" and "READ DATA FROM RADIO" and read the radio as you would normally.
- Click on "READ".
- When the popup window for the password comes up you will need to press and hold the control (CTRL) key while typing the word "system" (no quotes), while still holding the CTRL key click "Ok" or press enter
- The software will now read the radio and you are all set!
TK-481 Received Signal Strength Indication (RSSI) Firmware
Sometime in 2010 special amateur radio edited firmware, NOT released by Kenwood (i.e. don't ask them about it!), surfaced allowing RSSI readout on the display of the Version 2 TK-981 and TK-481. This firmware was based off of Version 2 Kenwood TK-x80 series firmware (unknown revision) and allows an arbitrary number between ~25 and 125 to be displayed on the upper left side of the display of the radio. These numbers are based off of how strong or weak a signal is into the radio's receiver; for example a weak signal would read 40 or thereabouts and a strong full quieting signal would read 122. The firmware has no other special features other then RSSI readout as some have referred to this firmware as "special ham firmware", there's not much special about this firmware other than it has been edited to allow the RSSI feature. This firmware is NOT for use in LMR commercial service.
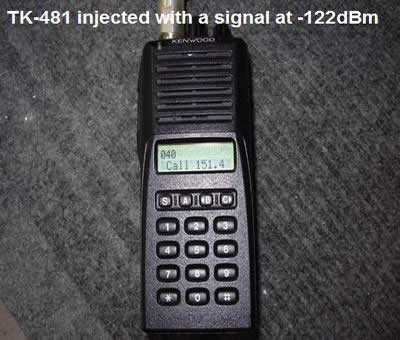
Pictured below is a Version 2 TK-481 being injected with a signal on 927.5000MHz at -122dBm; the display reads "040". An RF signal at -122dBm (0.18uV) would be very weak/noisy and would be just breaking squelch on the receiver.
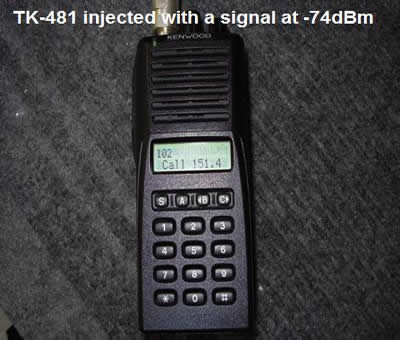
Pictured below is a Version 2 TK-481 being injected with a signal on 927.5000MHz at -74dBm; the display reads "102". An RF signal at -74dBm (45uV) would be very strong and would be very close to, but not completely, full quieting into the receiver.
The TK-481 has a RSSI test pad on the main RF board located below the front panel board. The RSSI pad when connected to a VOM will give a DC voltage from ~0.500 to 2.4Vdc corresponding to a RF signal strength to the receiver. It should be mentioned that this pad always functions regardless of the firmware in your radio. Testing the RSSI firmware feature with a TK-481 radio on the bench by injecting the unit with an RF signal from -124 to -50dBm and plotting the RSSI readout and RSSI test pad Vdc will give us an idea of how linear the response is of this feature. Test equipment used was an IFR 1200 Super S service monitor (NIST calibrated) and a Fluke 87 III VOM (NIST calibrated). One thing that is very important to remember is that every radio will be slightly different; in other words there is no universal chart that corresponds RF signal strength, in dBM or uV, to a displayed RSSI readout- therefore if you were to take the charts shown below and compare them to your TK-481 by injecting the same RF signal levels into your radio, the RSSI value displayed would be different from the ones shown here- it's an arbitrary number; unless you make your own dBm to displayed RSSI value chart for your radio, but short of making a chart, the displayed RSSI number is more of a novelty!
Pictured below are the results of bench testing the TK-481 RSSI firmware feature.
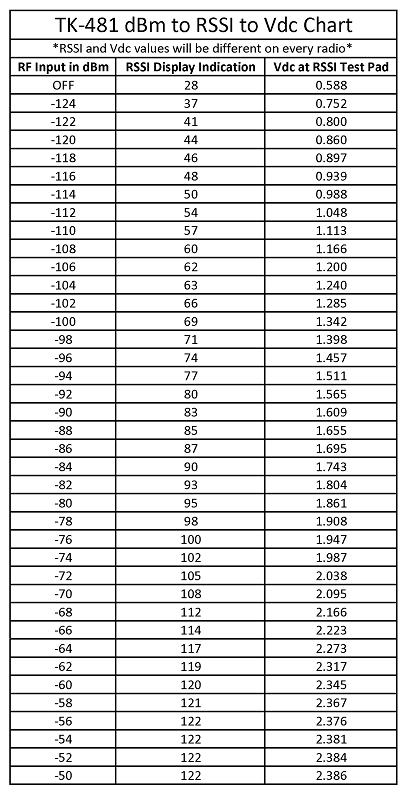
This chart is downloadable in PDF TK-481 RSSI Example Chart
A plot of signal strength, in dBm, into the receiver verses the displayed RSSI value is pictured below.
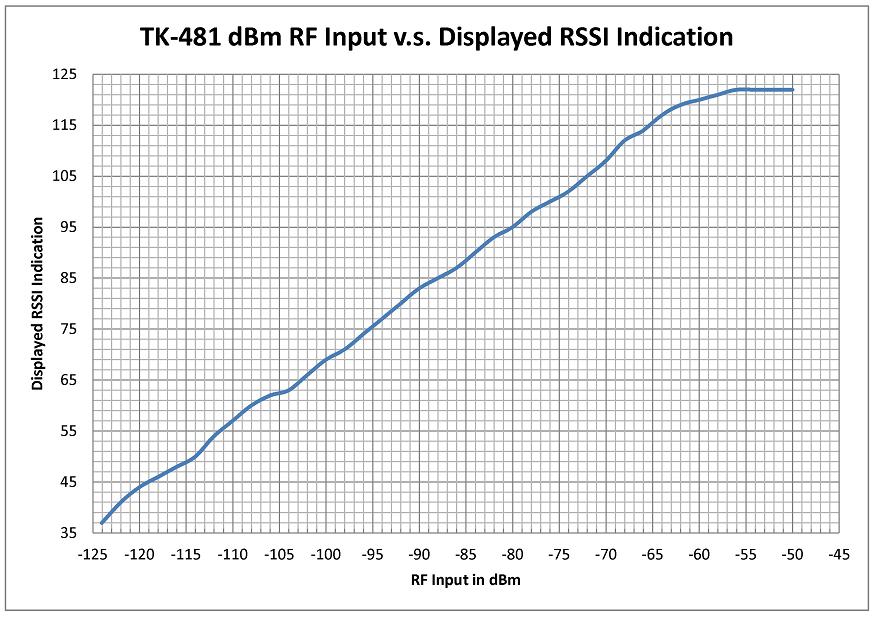
This plot is downloadable in PDF TK-481 dBm vs RSSI Displayed
A plot of signal strength, in dBm, into the receiver verses the voltage at the RSSI test pad on the main RF board is pictured below.
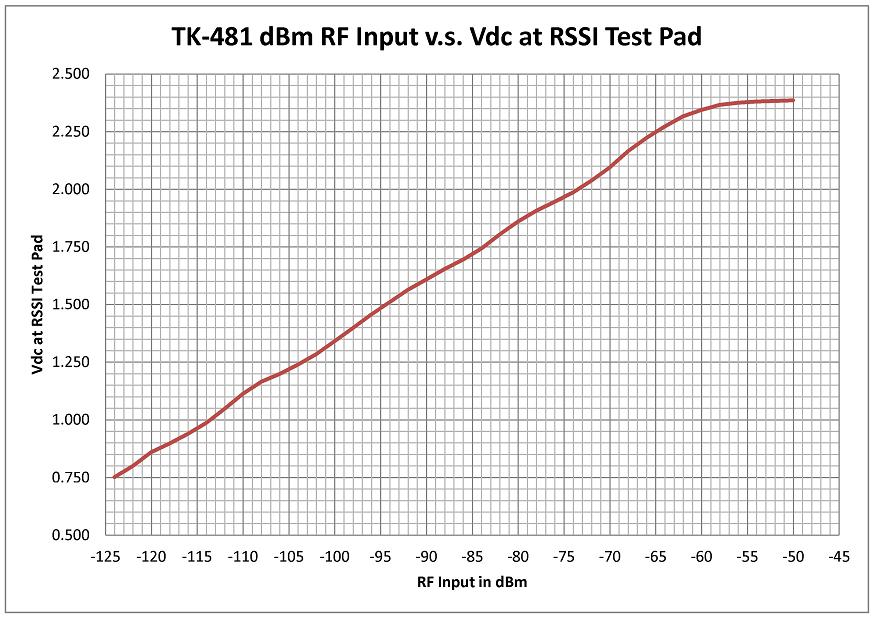
This plot is downloadable in PDF TK-481 dBm vs RSSI Vdc
TK-481 Version 2 Copy and Paste Feature in KPG-49D Versions 4.xx
This feature is very handy for changing and modifing any saved .dat file in KPG-49D version 4.xx (Windows based versions) for your Version 2 TK-481. This feature allows you to move around a frequency to another System/Group without having to re-run KW900EZP.exe each time. See steps/images below for further details:
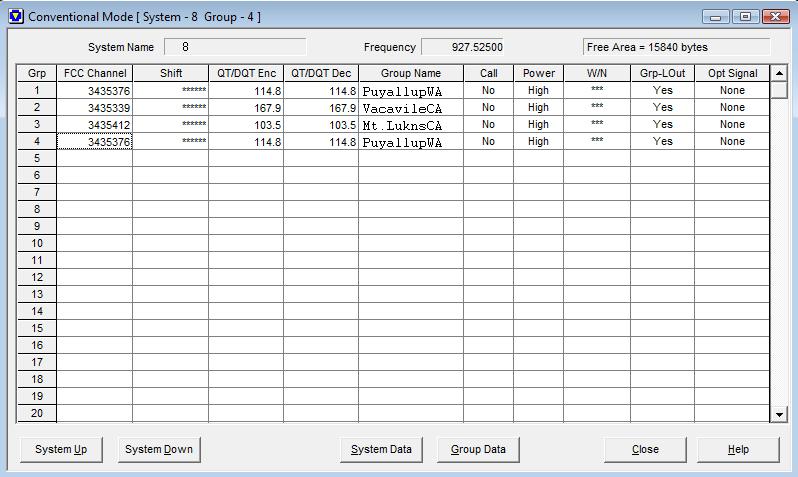
- In this screen shot selected is the "PuyallupWA" repeater in System 8 Group 1 and we want to move it a couple Groups down to System 8 Group 4- as an example. So we need to click on the Group 1 "PuyallupWA" Repeater FCC Channel number until it turns blue. Once blue press and hold the "CTRL" key and "C" to copy the contents of the FCC Channel box in Group 1.

- Once copied we can move the "PuyallupWA" repeater contents where ever we would like, into any System/Group. To paste the contents of the previous step into a different Group we can press and hold the "CTRL" key and "V" and the contents will paste into where ever we have selected- make sure you select where you want to paste the previous contents to by clicking on a used or empty Group under the "FCC Channel" box. Pictured below we have pasted them in System 8 Group 4- we can move this repeater to System 5 Group 6, System 2 Group 15 or anywhere in the file that we want- I chose to use System 8 Group 4 as an example of how copy and paste works.
- We can now delete the "PuyallupWA" repeater found in System 8 Group 1 and insert any repeater we want in its place by entering a new FCC channel number or using copy and paste to move another repeater from a different System/Group. Using the copy and paste method means you do not need to re-run KW900EZP.exe!

TK-481 Version 2 Programming copy from TK-981 Version 1/2
If you happen to own a Version 1 or 2 TK-981 and have it programmed the way you want it and you happen to own a Version 2 TK-481 you can painlessly program that radio using the file you have in your Version 1 or 2 TK-981! To do this you must be using KPG-49D Version 4.xx (Windows based versions). This also works the other direction, if you own a TK-481 Version 2 and want to program a TK-981 Version 1/2 mobile- the key is to make sure that you have the "Fleetsync Enhanced Function" checkbox UNCHECKED when doing this as mentioned in step 3.
The how to is as follows:
- Run KPG-49D and open your TK-981 Version 1/2 .DAT programming file.
- Go to the "Model" menu at the top of the program and select "Model Information".
- You should have "Fleetsync Enhanced Function" unchecked and the model radio shown should be "TK-981[Mobile]".
- Go to "TK-981[Mobile]" and select "TK-481[Portable]" OR "TK-481[Portable](Key Pad Model)" if you have a DTMF TK-481, click "Ok".
- You will get a message stating "Key and COM data will be cleared", click "Ok"
- You will have to configure the TK-481 front keypad assignment i.e. select which front panel buttons you want to do what and it would be a good idea to go through and select and double check all the option menu's.
- Save the file as a different name and enjoy the painless transfer of all your TK-981 memories!