Programming the TK-931
Programming Cable
To program up any TK-931 to the 33cm band will require the KPG-4 programming cable. You can make your own DB-9 to 6-pin RJ-12 adapter with the MAX232 IC or this cable can be had for around $10 online. I prefer a pre-made programming cable because it is cheap, saves time, and it makes sense rather then spending time laying out the connections and digging for a RJ-12 6 pin connector. You can use a USB cable or DB-9 Serial Port cable, both will work just fine with Kenwood Burn.
The TK-931’s can be programmed using Windows 95 thru Windows 8!!! There is no need for a slow old computer as processor speed is not critical with reference to programming the radio.
Programming Mode
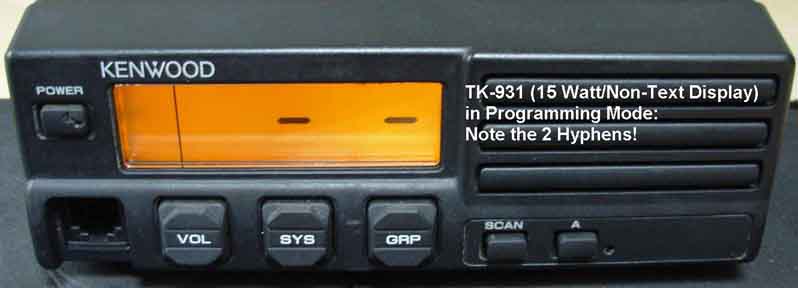
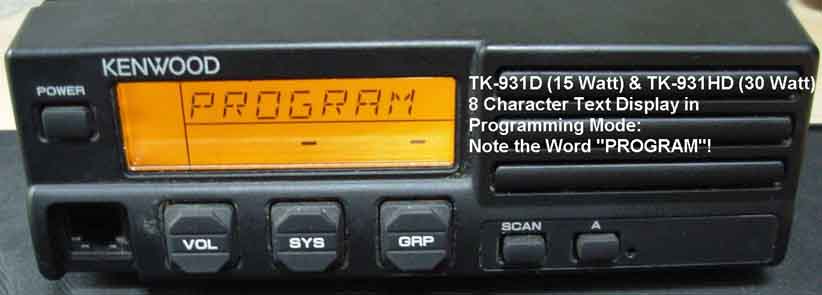
To put the TK-931’s (any version) into programming mode press the power button while pressing the “A” button- continue holding the “A” button for 5 Seconds then release. If you have an alphanumeric display then the radio will display “PROGRAM” if you have a non-alphanumeric display the radio will display 2 hyphens " - - " on the display. The TK-931’s use the front 6-pin (RJ-12) microphone connector for programming- specifically to Receive Data through pin 6 (Hook) and Transmit Data through pin 3 (PTT signal in).
Software Needed [Legal]
To program up any TK-931 you will need the freeware program Kenwood Burn (Knwdburn.zip). The previous methods, before the advent of Kenwood Burn, was to use Kenwood KPG-5D and then Hex edit the FCC channel numbers stored in the *.F90/*.B90 file. After using the hex editing method then came along KW931EZP.EXE and KW900EZP.EXE, developed by Pete Dziomba, N2MCI. These programs automated the hex edit modification process of FCC ID channel numbers into their equivalent 902/927 counterparts.
Kenwood Burn is the newest program to come along. The program is Windows based software and freeware and was developed by Steve Zingman, N4IRS along with the help of a few other Hams. The program is very easy to use and will program any version TK-931. One must be very careful when using the program because it will allow you to program the radio outside of the amateur radio frequency allocation!
The program will program any 927.xxxMHz frequency with the standardized 25MHz repeater offset or any offset for that matter from -1 to -39MHz. Take note that the repeater offset you choose is the repeater offset that will apply to every repeater frequency you have entered- i.e. there is no mixing of different repeater offsets.
One more note on programming: do not worry about doing any permanent damage when writing data to the radio that may have somehow been corrupted by you when, for example, hex edited the saved data file, or if radio power was lost midway through rewriting data. Unlike some of the Motorola radios, the Kenwood TK-931 cannot be made into a brick, paperweight, or doorstop, when corrupted data is written to the radio. If the radio doesn’t like the data simply rewrite it and move on with your life.
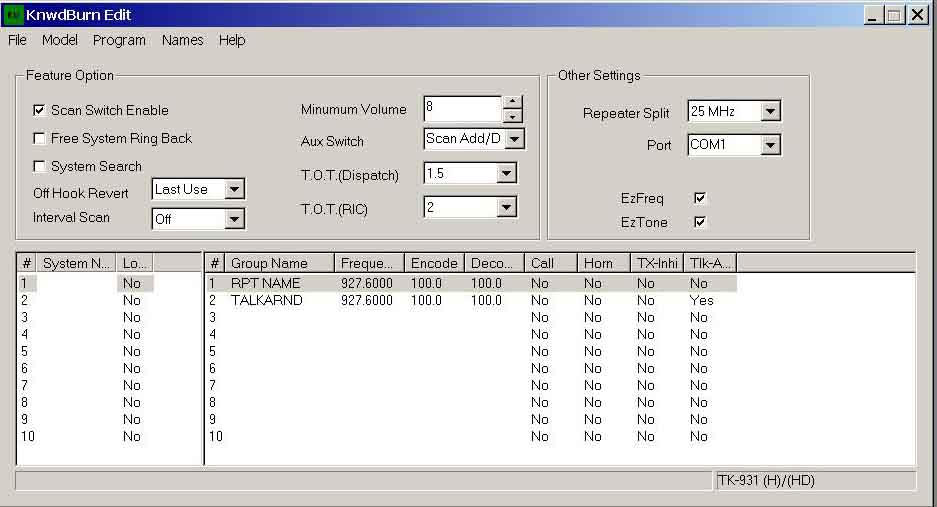
Pictured below is a screenshot of Kenwood Burn the radio being programmed is a TK-931D/HD – the TK-931 screen will look similar except that the “Group Name” will show “********” because this radio does not have a alpha-numeric text display- it only has a numerical display- there are also only 6 Systems with 4 Groups in each System.
How-To Programming of the TK-931’s using Kenwood Burn
1. Run the Program Kenwood Burn on your computer
2. Select the version radio you have under “Model” i.e. TK-931 or TK-931D/TK-931HD
3. Select the “Repeater Split” (offset) you are going to be using, as most repeaters are a 25MHz offset- remember the offset you decide to use is the offset that will apply to every repeater you program in the radio- there is no mix and match of different offsets
4. Select the COM Port on your computer that you are going to be programming the radio though. Go to “Port” and select the COM port in the drop box
5. Select what function you would like the “A” button on the front of the radio to function as under “Aux Switch”. I would recommend that the “A” button be programmed as “Scan add/del.” This function will allow you to lockout a System during System scan. See the troubleshooting section “Help! My Scan Add/Delete function does not work.”
6. The Name/Location/etc. of the first repeater you would like to program can be entered in the #1 “Group Name” column- if you are programming a TK-931D/HD, this spot is pictured above, and I named the first repeater as “RPT NAME” as an example. If you are programming a TK-931 then you only get channel numbers and there is no text.
7. Select the receive frequency in the column named “Frequency”.
8. Select the Encode PL (Transmit Tone) in the next column over named “Encode”
9. Select the Decode PL (Receive Decode Tone, a.k.a. tone squelch, a.k.a. CTCSS) in the column named “Decode”. A note of caution: its not a good idea to leave this column blank as there is so much junk (Part 15 stuff/Canopy) on 900MHz that you should always run tone squelch. Remember also that the microphone must be hung up in a grounded microphone hanger clip or Pin 1 to pin 6 on the rear Molex connector must be jumpered to enable tone squelch and the scan feature.
10. To program a Talkaround (simplex) frequency the same steps would apply above except that in the column labeled “Tlk-A” you would select “Yes” this tells the radio that this Group channel is a Talkaround (simplex channel) and not to apply the repeater offset. Pictured above in System 1 Group 2 I programmed up a Talkaround (Simplex) frequency and named it “TALKARND” and selected “Yes” under “Tlk-A”. In my example above the radio will be transmitting and receiving on 927.600MHz with an encode/decode PL of 100.0Hz.
11. To program the next repeater select the next System to be programmed, go to the column at the far left of the screen and under the “#” to the left of “System Name” and select the “2” this is System 2 (basically memory channel 2)- enter your repeater info in Group 1. DO NOT program every repeater in your area in System 1 or System "x" and increasing Groups!!! The reason that the radio should NOT be programmed this way is due to the fact that the radio ONLY scans System's, and the selected Group in each System. If, for example, you have 8 repeaters in your area, you will program the repeaters in Systems 1 thru 8 and Group 1 in each System- although the Group number is not critical because whatever Group you program a repeater into can be selected and therefore scanned.
12. The next repeater you will enter in will be programmed in under System 3 Group 1. Go to the column at the far left of the screen and under the “#” to the left of “System Name” and select the “3” this is System 3 (basically memory channel 3)- enter your repeater info in Group 1. This is basically the same as memory channel 3, but in a different format than you are used to seeing with amateur gear.
13. At this point once you have filled up the first 10 Systems (TK-931D/HD) or 6 Systems (TK-931) then start back at System 1 Group 2, you can keep going along until you have filled the entire radio up with repeaters or simplex frequencies- you are now ready to write the data to the radio.
14. At this point it would be a good idea to save the file to your computer by going to “File” at the top of the screen, and then “Save as”. Name the file what you would like. The file extension will be added automatically- a TK-931D/HD will be saved as an .F90 file and a TK-931 will be saved as a .B90 file.
15. Power on radio into Program mode. Hold the “A” button for 5 seconds while powering on the radio
16. Connect the programming cable to the Microphone port on the front of the radio
17. You are now going to write the data to the radio: go to “Program” and select “Write to Radio”
18. A “Progress” window should appear with the programming “Status”
19. At this point you should have a blue bar graph showing the programming progress. When the “Progress” window has closed, power off the radio and then power it back on again and you should have programmed radio. If you have any problems see the section named “Help! My Radio Will Not Program”.
20. One thing to remember is you cannot hurt the radio if something goes wrong in programming it, this may occur with the Motorola’s but does not occur with the Kenwood’s- i.e. don’t loose any sleep over writing data to the radio- your not going to make a brick or doorstop out of it!
Enabling Full Time Tone Squelch and Scan
To enable System Scan, and tone squelch (if you have tone decode programmed) you must either do one of two things: hang the microphone up in a grounded microphone clip hanger or place a jumper from pin 1 (hook) to pin 6 (ground) on the rear Molex connector.
I prefer the grounded mic clip to the jumper method, but if you do not want to use a grounded mic clip then you can make a wire jumper to fit the on the rear Molex connector using two .062” Molex pins and a short piece of 18AWG wire. Please note: you MUST unplug the rear Molex connector when programming the radio or you will be unable to program the radio (see the programming troubleshooting section of this guide for further details). If you prefer the grounded microphone hook method then keep in mind when the microphone is off hook the radio will be in carrier squelch mode. If you do use the grounded microphone hook method and the radio is scanning and you remove the microphone from the hanger the radio will stop scanning and go to the system that “Off Hook Revert” is programmed as; either “Last Used” or “Last Call”.
Clone Mode
If you already have a TK-931, which has been programmed for the 33cm band, you will be out of luck if you want to try and use clone mode for programming! Clone mode only functions when commercial frequencies are programmed in and will not function once amateur frequencies have been entered.
Clone mode functions as follows:
1. Ensure both radios are powered OFF
2. Using the microphone cord of one of the radios (microphone itself disconnected) connect both radios together via the microphone ports.
3. On the radio that is already programmed (Master) set the radio to program mode- Press the “POWER” button while holding the “A” button for 5 seconds then release- the display should now say “PROGRAM”.
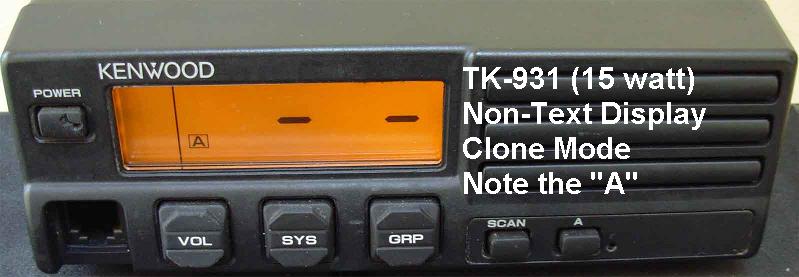
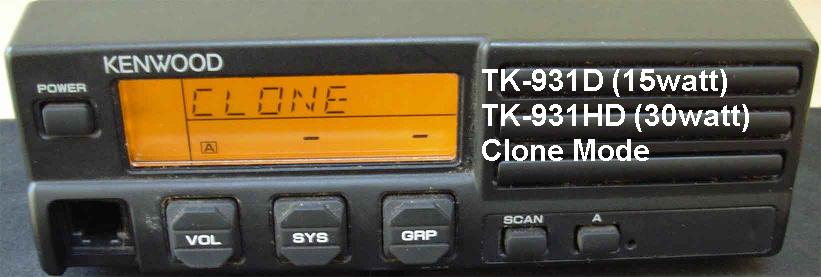
4. On the Master radio press the “GRP” up button- the display will read “CLONE” and the “A” indicator will display.
5. On the radio to be programmed (Slave) put the radio in program mode, press the “POWER” button while holding the “A” button for 5 seconds then release- the display should now say “PROGRAM”.
6. On the Master radio press the SCAN button and “S” will display on the screen- this will indicate that the Master radio is transferring data to the Slave radio. When cloning is completed the “S” will disappear. If there is an error a triangle “u” will flash on the screen- check your connections, check your sequence of events etc.
7. When the radio is finished programming, disconnect the microphone cord and switch the slave set off and then back on again- you now have 2 identical radios!